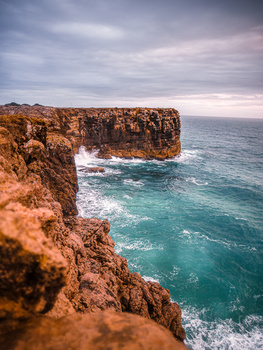
After a recent landscape session in the rain, I was shocked. Reviewing the files at home, I found that I accidentally shot in JPEG. Is all lost now? Let’s take a look at this very underrated format.
'Professionals Only Shoot Raw!'
One of the first lessons which I learned in photography was “Raw is better than JPEG.” Period. Since that time, I rely on my Raw files, no matter if it's for documentary work, private photographs, or landscapes. Especially for the latter, raw is superior: A supposedly better effective dynamic range makes recovering shadows and highlights easier and the white balance always stays under control.
While climbing deeper and deeper into the rabbit hole of photography, I learned that JPEG isn’t all that bad. Seemingly, there are also photographers who prefer this format. Many of them come from the Fuji camp. Fuji offers different film simulations which found an avid fan base amongst its users. But why limit yourself if you can have full control of your photographs?
Shot in JPG by accident
How Compression Works
After All, JPEG is inferior in its attention to detail. The Raw format offers you information about each and every pixel, while JPEG is an already edited format. Your camera collects data on its sensor, interprets it, and produces a developed file. There are two reasons why JPEG exists: It consumes less memory space and it doesn’t necessarily need to be manually developed.
The reduction of data happens by compressing an image. When we write “xxxxxxxxxxxxx” we store twelve letters on a sheet of paper. We could also compress it to “12x” for only one-fourth of the space. Image compression is much more complicated but relies on the same principles: You summarize data to save memory space. When saving and opening a JPEG file many times in a row, compression will ruin your image.
In most cases, some information will already get irreversibly lost with the primary JPEG file. Your camera develops your image and if it decided that there is no contrast between an area of pixels, they will look all the same. No matter how far you’ll pull the contrast or clarity sliders.
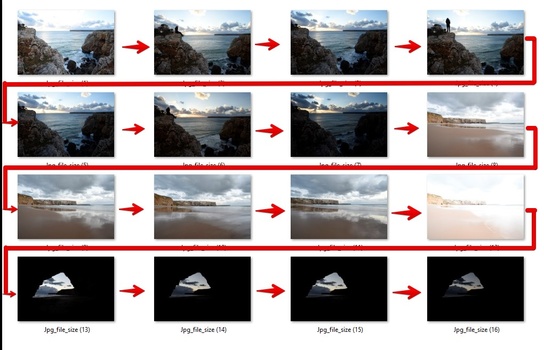
A rule of thumb: The less detail, the smaller the file size.
Can You Shoot Landscapes in JPEG?
When recently I found that somehow I changed my camera’s file format from Raw to JPEG, I was shocked. It sometimes happens to me, when I miss the button for changing the ISO, which is right above the button for changing the file format on my Nikon D750.
After the shock, I was surprised: It didn’t even matter. I could edit the photograph exactly in the way in which I had in mind while shooting. It even saved me some time, because the photograph wasn’t as dull and boring as I usually find my Raw files before they are cooked into a (sometimes) tasteful photograph. I just had to care for minimal exposure changes and a few local adjustments. Was I wasting time and memory space all my life?
I didn't need a Raw file to create this edit.
I felt like an absolute beginner and a conspiracy theorist at the same time. How come everyone only shoots in Raw when there was basically no downside in my edit? I quickly realized that my landscape photograph of rainy scenery at a cloudy coastline wasn’t really representative of the average dynamic range of a landscape photograph.
What I needed was a direct comparison and some pixel peeping.
JPEG Tested Under Harder Conditions
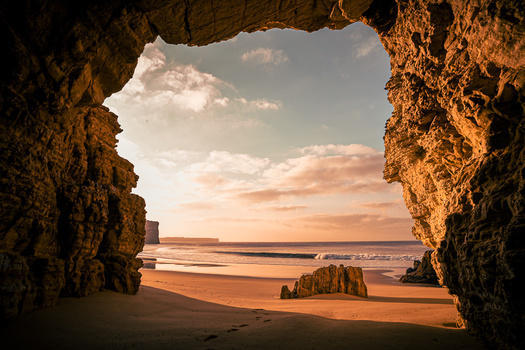
When the weather got a bit better, I tried out some locations where I expected harder conditions for landscape photographers: caves at the beach. Inside the caves, there would be far less light than outside. A situation, where it is almost impossible to cover the full dynamic range within one frame. Yet, the original JPEG file looked better than expected.
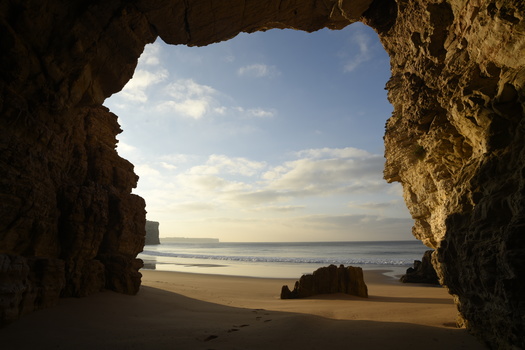
The JPG straight out of camera.
The “Picture Control” menu of my Nikon D750 gives me the option to choose between different JPEG development styles. Even though the different styles don’t look very different, “vivid” or “landscape” were my favorites. The final photograph definitely looks appealing, but is it enough? I don’t expect it to compete with a properly edited Raw file.

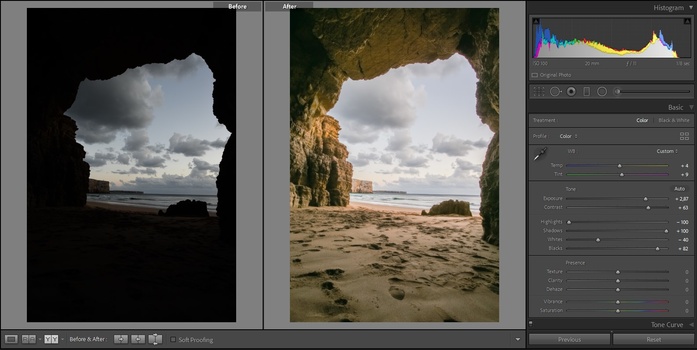
An editted Raw file of the same scene.
Here, I found a lot of freedom to edit. Uncovering the hidden structure underneath the shadows was no problem, just as getting more detail in the sky was done within a shift of a slider. Even though it wouldn’t necessarily be my preferred way to edit this photograph, local adjustments helped to get a lot of detail back into the lone rock, which seemed to be lost in the JPEG. But was it really? To double-check the JPEG capabilities, I also edited the JPEG file in Lightroom. Much of the detail was still available, too.
The JPG carried a lot of hidden detail as well.
The Limitations of JPEG in Landscape Photography
In these examples, I took a lot of care for a good exposure, which would allow me to bring back the detail in both highlights and shadows. While one could see the difference in the quality of JPEG files, it wasn't as bad as I had expected. In fact, I’d claim that you can’t see the difference in low-resolution images.
Same counts for underexposed photographs. Even in the darkest shadows, the Raw files will still offer us the chance to recover detail, even though there will be some noise in the final image.
Even a JPG edit of a really low exposure looks fine from the distance.
The JPEG files on the other hand, really struggle with very dark parts of the images. A lot of artifacts appear, along with colorful spots. You can get rid of some of them by using the “Detail” panel in Lightroom. Eventually, the dark areas will look like a bad print on canvas, though.
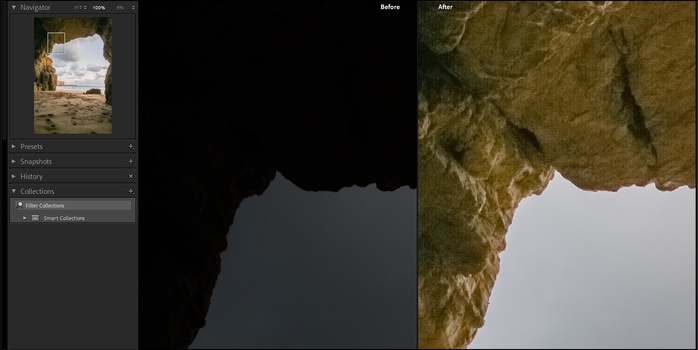
Zooming in to 100%, the lack of detailed information becomes visible.
Just like the recovery of shadows, getting detail out of the highlights is not a big problem with the Raw files. However, there will be blown-out areas, which will hopelessly be lost. Before the structure completely disappears, these highlight areas will also lack color information. You can’t shoot into the sun and expect to see all its details. Again, it’ll probably be fine as a social media picture. Especially in prints, bigger areas of blown-out highlights appear rather ugly.

Even blown out highlights can be recovered with Raw files to some extend.
My D750’s JPEGs, however, really look horrible when I try to recover highlights. There are no artifacts as we could witness when recovering the shadows. Instead, there is simply nothing hidden behind the white areas. Pulling the exposure to the left, I couldn't find the slightest idea of a shape in the sky. White only becomes gray.
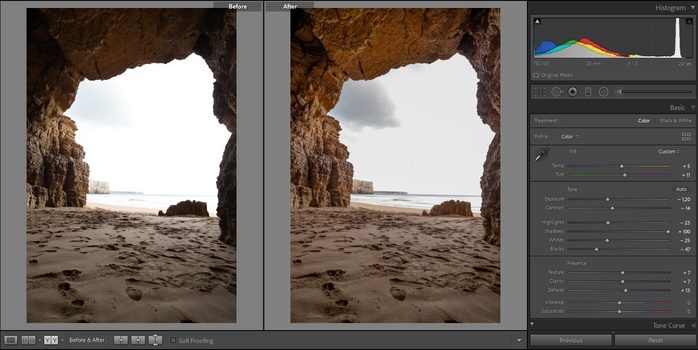
In case of JPG-files, this information is hopelessly lost.
Use JPEG Only When You’re Sure
There are a lot of downsides of JPEG depending on the purpose of your images. Especially when you can’t cover the full dynamic range, you’ll have problems with the edit. But why would you use JPEG if you’ve got to edit the photographs anyway?
When you need to send or upload your photographs quickly, a well-cooked JPEG might be superior. Sports photographers and photojournalists often rely on quick transmission. You can experiment with your in-camera settings and pre-sets for JPEG development until you'll find a good recipe that works for many cases.
Especially when you want to quickly upload your photographs to social media, a JPEG-file will be quickly transmitted to your phone, where you can easily edit it because of its small file size. A lot of detail gets lost during the upload anyway. On the other hand, many advantages of Raw files will also be visible on your social media channels. Even on 1080 x 1080, severely blown-out highlights will be an issue.