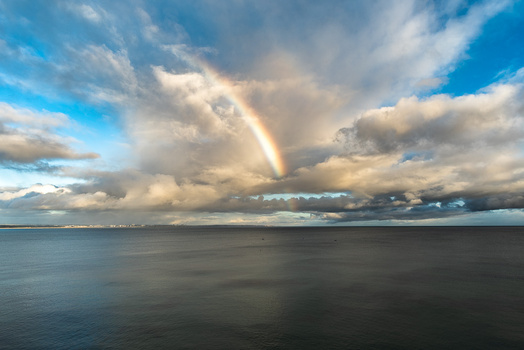
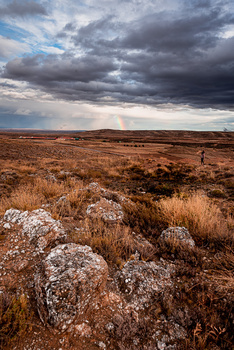
Double rainbow and supernumerary rainbows on the inside of the primary arc. The shadow of the photographer's head on the bottom marks the centre of the rainbow circle (antisolar point).
Whenever you see one, you’ll point at it, kids love to draw them, and some believe that there is a pot of gold hidden at their end. To me, photographing a rainbow is enough of a gift. Here, you’ll get to know how to increase the chance of seeing a rainbow and how to photograph and edit one.
Most of us will have realized that we can’t get closer to the rainbow than we were when we first saw it. The leprechaun won’t share his wealth. Hence, the Irish myth of the pot of gold rather reminds us of a cruel reality: we mustn’t wait and hope for lucky coincidence but need to work hard for our fortune. How true!
Even when we want to photograph a rainbow, sitting and waiting is not always the right choice. Preparation and understanding the circumstances of a rainbow can save you a lot of time waiting, even though there is no guarantee for the magic moment to happen. Weather is only partly predictable, but it still is the only thing that counts when we want to see a rainbow.

All you need is light and rain.
What Is a Rainbow?
The rainbow in its ROYGBIV colors (i.e. red, orange, yellow-green, blue, indigo, and violet) has been examined and described as an optical phenomenon by Isaac Newton (the one with the apple). In fact, there are far more colors involved. But Newton, as the first person who really understood what is going on “inside” the rainbow, was the one to define seven of them. Newton felt that, just like music notes, colors should be divided into seven — a kind of magical number.
More importantly, he found out that, when white light hits a prism, it refracts into different colors. You might remember the album cover of Pink Floyd’s “The Dark Side Of The Moon,” which visualized the phenomenon. Because of their different wavelengths, each of the colors will leave the prism at a slightly different angle. Red, as the visible color with the longest wavelength, is on top of it, while violet is the visible color with the shortest wavelength and thus makes the bottom of the rainbow. There are also longer or shorter wavelengths like infrared and ultraviolet, which aren’t visible to the human eye.
As rain doesn’t consist of prisms but drops, the white light won’t simply refract, but also be redirected towards the light source, which is the sun. Hence, we have to stand with the sun in our back and a rainy landscape in front of us to witness a rainbow. Because the light is sent back at an angle of 42°, we witness the rainbow as a bow.

The science of a rainbow. Image by KES47, public domain, via Wikimedia Commons.
When Is the Best Time for Photographing a Rainbow?
Depending on your location and climate zone, the chances of seeing a rainbow can be higher or lower at certain times. Currently, I am traveling through the south of Portugal, one of the warmest regions in Europe. While my home country, Germany, won’t see too many rainbows at this time of the year but rather a permanent, dull, and gray sky, the situation looks better here.
In fact, it’s the best I ever had. Almost every second day, we witness a rainbow. Some of them I saw by chance, some of them I even expected and took my camera on a hike. In Portugal, they also have a season that is supposed to be winter. Every now and then, there is heavy rain, but the sun is also shining regularly. It’s that mixture of the weather which will increase the chance of a rainbow up to almost certainty.
We also need the right angle of the sun to see enough of a rainbow. If the sun is high up in the sky, a rainbow would only be visible underneath us. We rarely see a suitable wall of rain there, as long as we don't sit in a plane. Hence, we also need a low-altitude sun, which is generally the case in the winter (in the Northern Hemisphere) or in the early morning and evening.
If you are up for shooting a rainbow, you can plan your composition according to the location of the sun, using software like The Photographers Ephemeris. Then, you need to wait until the forecast predicts really changeable weather. Especially when a rain front hits and passes your area, the chances of seeing a rainbow are really high. Still, the clouds should appear behind your subject and the low angle sun needs to be behind you. Good Luck!

Most of the time, you will only see a fraction of a rainbow in the rainy areas. Still, it adds to the overall feeling of an image and makes a good subject.
How To Compose a Photograph Including a Rainbow
The funniest part is playing around with rainbows.
Some people swallow them, some send them out of their bellies, and a friend of mine let it glow out of the emergency lights of her ambulance camper van.

I don't have emergency lights on my camper van, but this picture shows you that a full rainbow will have trouble fitting into your frame when shot on a focal length of 24mm on a full frame camera.
Covering the full bow needs special gear, though. As we learned that the rainbow consists of light which is reflected at 42°, we need a field of view of at least 84° to cover the bow from left to right. A 24mm lens gives us just about the right coverage to capture the full rainbow, but it will touch the edges of the frame and won’t leave a lot of space for composition. A lens below 20mm is needed to give your rainbow a little space in your composition. Panoramic photographs and the stitching will help, too, as long as you’re fast enough to recompose before the magic is gone or the sky changed too much.
It’s not necessary (and in most cases not possible) to include a full rainbow in your photograph. Often, we only see a fraction of it. In that case, it still adds to an image. A rainbow always is a point of attention in any image, and sometimes, it steals the main subject it shows. It makes a great frame for your subject but will draw some attention to it.

Even the smallest hint of a rainbow will become a focal point of your image.
How To Edit a Rainbow
When looking at the raw images of my rainbow, I’m always disappointed: that’s not what I saw! Even though we witness rainbows as colorful and prominent, they are often quite unobtrusive in our images. That’s not a problem if you know how to make it pop.
I always start with a gradient adjustment in Lightroom, using the “Sky” preset as a starting point. It increases contrast, lowers highlights and shadows, and pushes the whites a bit, which makes every sky pop. A good amount of added clarity also makes the clouds appear more contrasty. Generally speaking, all the adjustments try to keep the clouds bright and separated from the sky but recover detail in the brighter areas. It’s exactly what we need for our rainbow as well.
Sometimes, I am already happy with the results of the present; sometimes, I adjust them a little further, usually trying to lower the general exposure, while keeping the whites as close to clipping as possible. Of course, all these adjustments only make sense if you didn’t shoot with a graduated ND filter. In that case, you need to add a little local contrast and clarity.

A rainbow needs to pop!
Between Luck, Patience, and Planning
A rainbow never comes with certainty. Sometimes it appears even though you didn’t expect it. Sometimes, the weather looks really promising, but as soon as you get out, the sun won’t reach the right angle without being covered by clouds. As it always happens with landscape photography, you need to be patient and prepared. Keep an eye on the weather when you're outside because sometimes a rainbow doesn't stay too long. Make sure you already have a good composition in mind when you are about to be in the middle between sun and rain.
Did you ever manage to shoot a perfect, full rainbow? Mine has yet to come, but I am also happy about every little glimpse at this amazing phenomenon.


